Flashiibo Pro User Manual
Flashiibo **Pro**
What’s in the boxBasic controlsTurning on the deviceEmulating AmiibosPre-Loaded DataImport All-in-One FilesUsing iPhoneUsing AndroidUsing PC / MacUsing the emulated Amiibo / Scanning it on the SwitchSpecial instructions for BotW and TotKSpecial instructions for Kirby Air RidersNavigating the systemIncreasing number of slotsOption 1 - New batch of slotsOption 2 - Create files directlyFirmware updateNeed more help?Credits
What’s in the box
The following items are in the package.
-
Flashiibo Pro (Rechargeable + OLED screen)
-
The screen comes with a protective film (2nd Gen). **If you see scratches when you receive it, it’s likely on the film, not the screen itself. If you **find it challenging to remove the film,** try using a duck tape to help lift a corner first.**
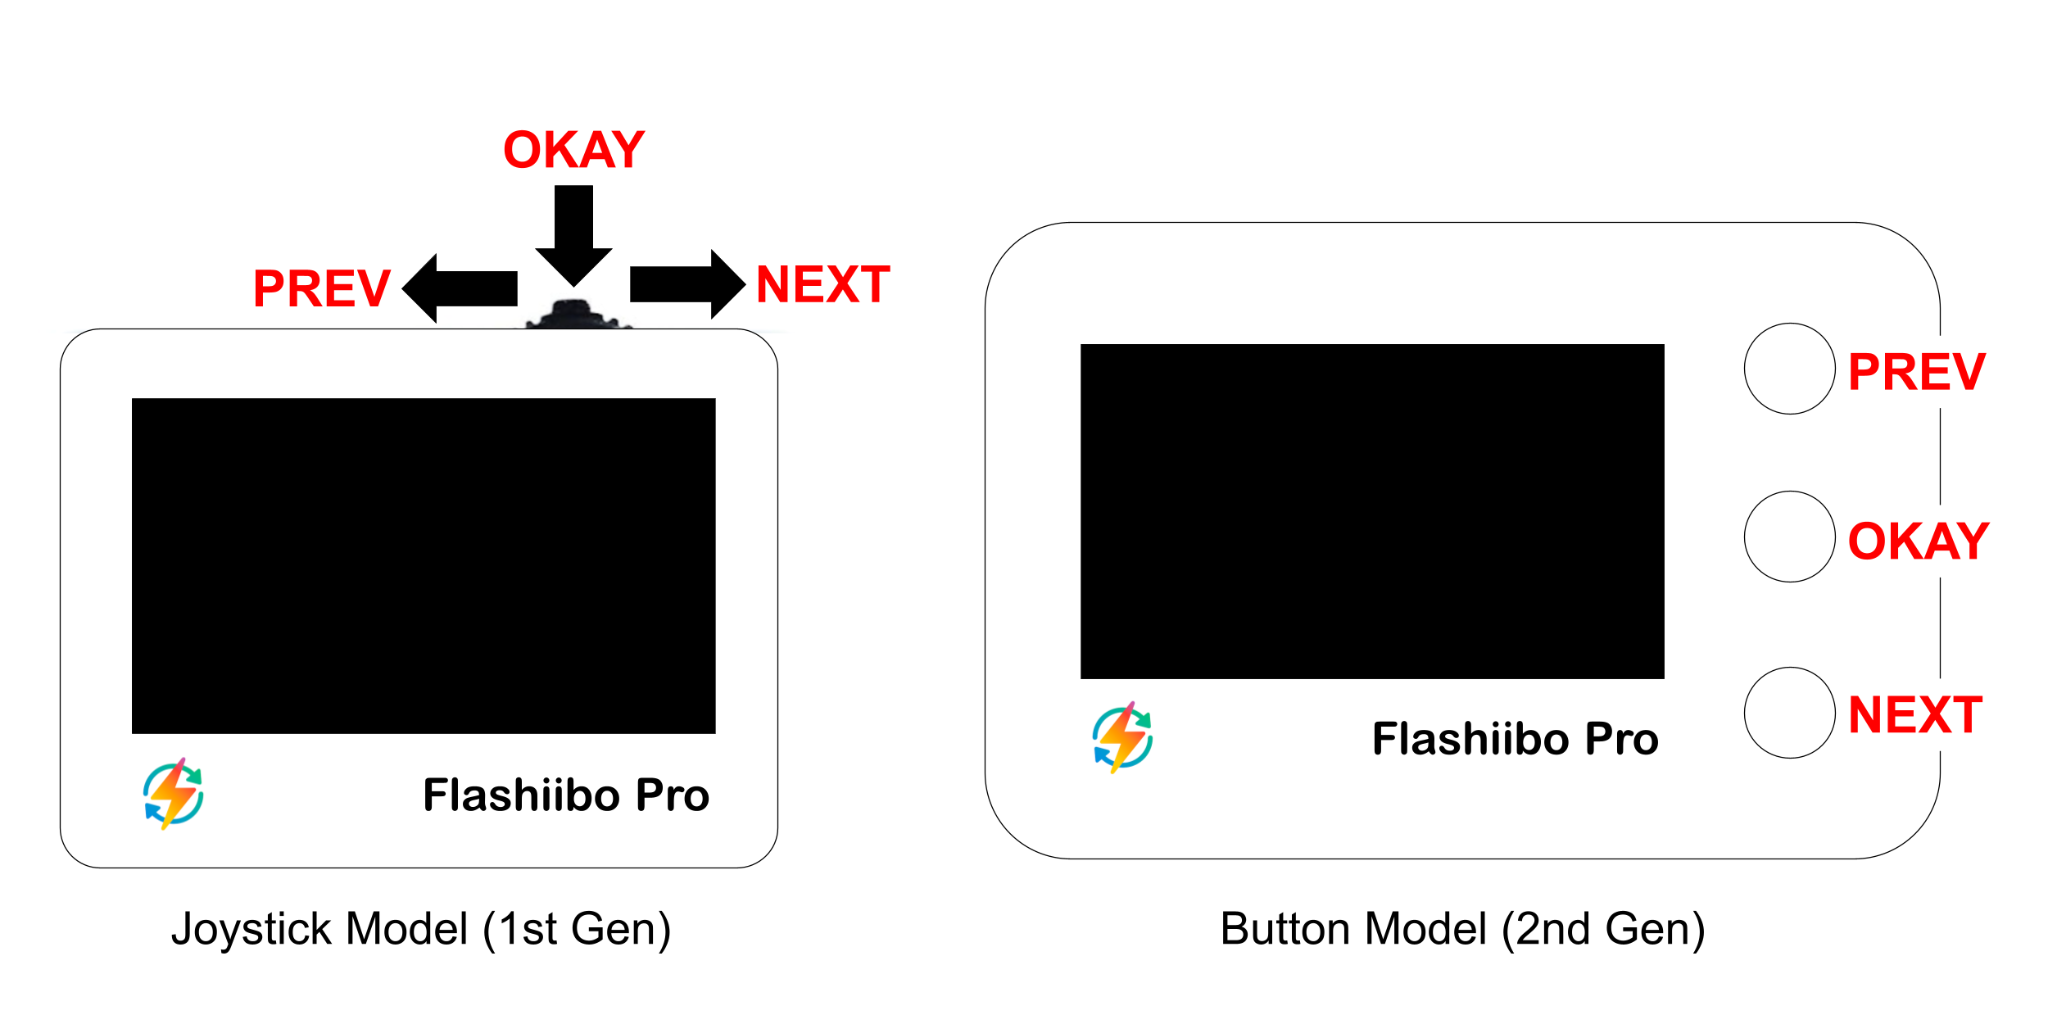
Basic controls
-
PREV – Navigate left or up
-
Joystick LEFT on Joystick Model (1st gen)
-
UP button on Button Model (2nd gen)
-
-
NEXT – Navigate right or down
-
Joystick RIGHT on Joystick Model (1st gen)
-
DOWN button on Button Model (2nd gen)
-
-
OKAY – Confirm the selected item, long press for 1 second – show the context menu if available. If you find yourself stuck on a screen, use this option.
-
Joystick LEFT on Joystick Model (1st gen)
-
MIDDLE button on Button Model (2nd gen)
-
-
BACK = UP + DOWN (Firmware >= 84p)
- You can quickly press UP and DOWN together to go back to the previous screen. This only works on 2nd gen Pro and requires firmware 84p or later.
Turning on the device
You can turn on the device by simply pressing PREV, OKAY or NEXT. If your device doesn’t turn on, please try the following.
-
Connect it to a charger, a red light should turn on when it’s charging. Charge it for 3 minutes.
-
[2nd Gen Only] Hold the OKAY (middle) button for 10 seconds. That should reset the device.
-
[1st Gen Only] Take a fridge magnet (or other magnetic objects) and cover the device’s screen with the magnetic side. That hard resets the device.
If it can’t be turned on after all the above steps, please contact support@flashiibo.com for help.
EmulatingAmiibos
Here is a good guidance video on most of important topics.
Pre-Loaded Data
Recent units come with pre-loaded data out of the box. If your device comes with firmware version 55p or higher, you should be able to find it under Main Menu => File Explorer => _all. In that case, you can skip the rest of the “Making amiibos” for now. You can come back for the rest steps when the pre-loaded data somehow no longer satisfy your needs.
The files are organized by amiibo series. To use them, just select any file like /_all/
-
Turn on the device
-
Select “File Explorer”
-
Select “1. Legend of Zelda”
-
Select “8-Bit Link”
-
Now it’s ready to use.
If your device somehow doesn’t come with pre-loaded data, don’t worry, you can easily load the data by following one of the methods below.
Import All-in-One Files
See details here.
Using iPhone
-
Download iOS app Tagmiibo (instructions on claiming a discount)
-
On Flashiibo Pro, enter “NTAG215 Slots”. You can use PREV / NEXT to select 1 of the 100 slots to use.
-
Follow this video tutorial of how to use Tagmiibo to make amiibos on iOS.
- NTAG215 tags were used in this tutorial. In our case, use Flashiibo instead of the NTAG215 tags.
-
Make sure the back side of Flashiibo is facing the phone.
-
Remove the phone case if your phone has trouble reading or writing Flashiibo.
-
Other than that, the tutorial should work exactly the same way.
Using Android
-
Download our official Android app – Flashiibo Companion.
-
On Flashiibo Pro, enter “NTAG215 Slots”. You can use PREV / NEXT to select 1 of the 100 slots to use.
-
Follow the instructions in the app. Tutorial video
-
Make sure the back side of Flashiibo is facing the phone.
-
Remove the phone case if your phone has trouble writing Flashiibo.
Using PC / Mac
-
On Flashiibo Pro, select “User Manual” or “Manual & Bluetooth”, a blue light will start flashing. That means it’s ready for Bluetooth connection. Please note that the devices does NOT communicate with your PC / Mac over USB.
-
On your PC or Mac (with Bluetooth capability)install and open Google Chrome or Microsoft Edge.
-
Using Chrome or Edge, go to https://app.flashiibo.com/
- Alternatively, if you do NOT have access to those browsers, you can try download this UNOFFICIAL application (which is a wrapper around app.flashiibo.com). This is made by third party, we do not guarantee how reliable it is.
-
Make sure Flashiibo Pro is still on the “User Manual” or “Manual & Bluetooth” page.
-
Click on “Connect”, and select “Flashiibo Pro”.
-
Click on “Refresh” if no files or drives show up in the list below.
-
Click on “E:/ [External Flash]”.
-
You can now upload, download and manage the files on the device.
-
To upload amiibo bin files you own, click on the “Upload” button.
-
You can either select or drop-and-drop files.
-
Please note that upload by folders are NOT supported.
-
If you don’t see any upload progress, exit and re-enter “User Manual” or “Manual & Bluetooth” on Flashiibo Pro and try again.
-
Please keep the folder names and file names concise. The total path length cannot exceed 64 letters.
-
-
To download a file on the device, click on the file name.
-
To delete a file or multiple files, select one or more of them and click on the “Delete” button.
-
-
After you finish uploading the files, they will appear under “File Explorer” on the device. Select a file to emulate it.
-
Please do NOT put more than 100 files in a single folder, or else the device will crash.
-
Using the emulated Amiibo / Scanning it on the Switch
Here are some tips for scanning the emulated amiibo successfully.
-
Make sure amiibo feature in your game is unlocked and ACTIVATED (especially BOTW & TOTK). See this guide for more.
-
Make sure the correct amiibo file is selected on Flashiibo Pro
-
The scanning area is the right analog stick on Joy-Con’s, and the center logo area on the Nintendo Pro Controller.
-
Place the BACK and LEFT side of Flashiibo Pro on the scanning area. The NFC antenna is beneath the screen of Flashiibo Pro, so it is important to align its LEFT side with the scanning area of the controller.
-
Please use the official controllers.
-
If you are using third-party joy-cons or controllers, please make sure they support Amiibo / NFC. If they don’t work, try to find officially controllers and try again.
-
If you have a GuliKit Controller and it fails to scan Flashiibo, you need to upgrade its firmware to the latest version.
-
If it still doesn’t scan, try a different switch to rule out the possibility broken switch.
-
If it doesn’t scan successfully for some reason, try the following in the order described.
-
Make sure the amiibo feature is activated in the game. See this guide for more.
-
Remove right stick cap if there is any. Remove the swtich from its case if any.
-
Move the Flashiibo Pro around the scanning area of the switch joycon/controller to find a sweet spot. Move it further and closer to the scanning area to find the right distance.
-
Try on a different OFFICIAL joy-con or controller, or a different switch
-
Reboot Flashiibo Pro by going to Settings -> System Reboot (or Power Off), and try again.
-
If you are using the controller(s) wirelessly, make sure it’s fully charged.
Special instructions for BotW and TotK
Games like Breath of the Wild and Tears of the Kingdom limit one scan per amiibo. Fortunately there is a way around that.
By default, each NTAG215 slot has a stable UID, but you can replace its tag UID. To do that, select one of the NTAG215 slots, then press OKAY once, and then select “New Tag UID”, a new tag UID will be generated and you can use it again on the same day in BotW and TotK.
What’s even better, you may also turn on the option “Auto Tag UID” to put the tags in Auto mode. That way every time you try to scan, a new UID is automatically generated, allowing to claim rewards repeatedly without interacting with the device. Remember do turn this option off, when you need to use it with games like Splatoon and Super Smash Bros. Those games require a stable UID.
Special instructions for Kirby Air Riders
The Kirby Air Rider amiibos are of a different technology from the rest of the amiiibos. They are I2C Plus 2K (2048 bytes) instead of NTAG 215 (540 bytes). So not all flows work with this type of amiibo. Here is the only flow to upload and use them. Transferring the files through NFC or copying the file to a NTAG215 Slot are not supported.
-
Find and upload the files
-
Go to archive.org and search for “mcas amiibo”
-
Look for a collection that’s not older than Dec 18th 2025.
-
Download the 7z files and and unzip it.
-
In the Kirby folder find the air rider ones
-
Update Flashiibo Pro to the latest firmware if you haven’t already.
-
Go to “Manual & Blueooth” on Flashiibo Pro
-
Upload the files using https://app.flashiibo.com in Chrome or Edge on a PC or Mac.
-
Emulating
-
Open the newly upload file on the Flashiibo Pro, it’s now emulating.
-
It’s highly recommended to generate a new UID before registering the amiibo. It can be found in menu -> New Tag UID.
-
[Optional] If you need to swap the machine, go to the menu by pressing the “OK” button and select Machines.
-
Use it in the game
-
Open Kirby Air Riders on Switch 2, on the title screen to go Extras => Amiibo
-
Register the amiibo
-
Do some training
-
When you try to quit the training UI, the game will prompt you to write the training data back to the amiibo.
Navigating the system
Tip: when you are at the top of a list, PREV would bring you to the end.
-
NTAG215 Slots
-
Use PREV / NEXT to switch to the previous/next slot.
-
OKAY to show a menu.
-
New Tag UID: this generates a new tag UID, you will be able to use the amiibo as if it’s a complete new one.
-
Auto UID, this settings has 3 possible options.
-
OFF: UIDs stay unchanged until manually regenerated. This is the default.
-
ON: A new tag UID is generated automatically every time you scan the amiibo.
-
Zelda: All TLOZ (The Legend of Zelda) amiibos will have auto-generated UIDs on scan, except for those belong to SSB (Super Smash Bros) amiibo series. The exclusion of SSB ones is to make sure SSB players don’t have their amiibos accidentally overwritten with random new UIDs. If you don’t play SSB or Splatoon, you can simply set this to ON instead. Please note that for this option to show up, you will need firmware version 47p or newer.
-
-
-
-
File Explorer
-
Use the “..” button at the top to return the parent folder.
-
To return to Main Menu from a deep folder hierarchy, long press OKAY to call out a context menu and select “Main Menu” at the bottom.
-
-
Other RFID/NFC (previously RFID Slots)
-
Most users shouldn’t need this, as this feature has nothing to do with amiibo emulation.
-
You can emulate RFID cards/tags of the following types, MiFare Mini, MiFare 1K, MiFare 2K, MiFare 4K.
-
You can emulate NFC cards/tags of the following types, NTAG213, NTAG215, NTAG216.
-
Two slots are turned on by default, and you can turn on more slots in the settings.
-
-
User Manual
- Use PREV / NEXT to show the QR code. Press OKAY to exit.
-
Settings
-
Auto Turn Off: sets the idle time it takes for the device to shut down itself.
-
OLED Contract: sets the screen brightness or contract.
-
Menu Animation: turns on / off the animation; it is highly recommended to keep this option on.
-
Language: English, Spanish, Chinese
-
Storage
-
Total / Free
-
Format: this will delete all the slots / files you have, but it will leave the system firmware intact.
-
-
Power Off
-
Reset Settings: resets all settings to factory defaults; this doesn’t delete your files.
-
Version
-
Firmware Update: find out more here.
-
Increasing number of slots
There are a total of 100 amiibo/NTAG215 slots out of the box. However you can have more than 100 tags by following either or both of the options below.
Option 1 - New batch of slots
You can create a new batch of slots.
-
On Flashiibo Pro, go into “File Explorer”.
-
Rename the folder named “flashiibo” to something else. That’s it, you now have a complete new batch of 100 NTAG215 slots.
-
Your old slots are still accessible through file explorer. Simply navigate to the folder you rename to and select a file.
Option 2 - Create files directly
You can create a new files directly from the file explorer.
-
On Flashiibo Pro, go into “File Explorer”.
-
Long press OKAY, a menu will show up.
-
You can create a tag or a batch of new tags from this menu; you can also create your own folders for organizing purposes.
-
Once the new files are created, you can select them to emulate as NTAG215.
Firmware update
You can find out more about firmware here.
Need more help?
-
Check out the FAQ
-
Reach out to the community on Discord for help
-
Email us at support@flashiibo.com
Credits
The hardware and firmware of Flashiibo Pro are inspired by solosky’s pixljs. We’d like to thank all contributors for this wonderful project.